

Make a 1 inch scale pool table


What You'll Need
Materials:Tools:
Remember, all adjustments can be altered to fit your miniature rooms.
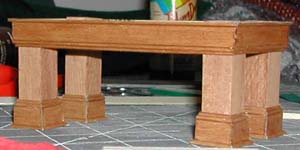
Let's start with the base. (We'll start out easy and work our way up.)
Table Legs
Materials used:
Cut four 2" pieces of the 1/2" x1/2" wood. Stain as desired and seal.
Cut and mitre 12 pieces of the baseboard moulding to fit around the bottom of the legs. The mitred pieces should measure 1/2" on its shorter flat edge. Stain and seal pieces as well.
Cut two pieces of baseboard moulding measuring 4 1/2". Cut another two pieces measuring 2 1/8". Again, these pieces should be mitred, and the shorter edge will be these measurements. Stain and seal.
Time to glue your pieces together! The 4 1/2" and 2 1/8" pieces form a rectangle, and the leg pieces are glued to the inside corners. Glue your 1/2" trim pieces to the bottom edge of each table leg.
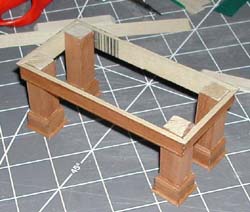
*NOTE* I glued my trim pieces to each other, and not the table leg. I never seem to be able to cut a straight line with this thickness of wood, so my edges always end up a little rounded. The trim pieces can correct this by not gluing them flush to the bottom of the leg. You can also use it to adjust the table height.
Continued on Next Page
Don't know how to cut mitre angles? It's time to learn! And believe me, you have plenty of practice for this project!
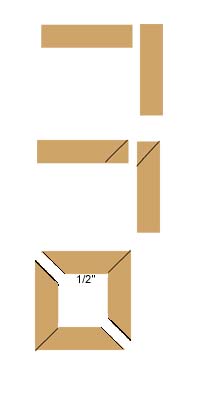 What you have is two pieces of wood that need to meet at a corner - a 90 degree (right) angle. Remember your high school math? We need an even cut on both sides, so we need to cut each angle at 45 degrees. A simple mitre box makes this very easy.
When mitring, think of the object you're creating angles around as a box. When you are mitering the outside of the box, (like in this project: the trim goes around the outside of the table legs) the outer side of the trim will be longer than the inside. When you're mitring the inside of the box (like the trim inside of a room) the side that goes next to the wall will be longer. Have I confused you yet?
I'll summarize. When you're cutting each piece for this project, be sure that the shorter side of each piece goes to the inside of the table. This way the wood can smoothly cover the table leg and the sides of the other pieces.
Back to Minis Page
Do-It-Yourself miniature Pool Table Tutorial
Copyright Elaine C. Brown, 2002