

1 inch scale pool table tutorial - Page 2


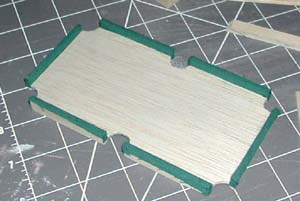
Now we have our table base. It's time to work on the table. It's not as hard as you think.
I chose balsa wood for the table base because it was easy to cut. If you have better tools than I do, go ahead and use a stronger wood. If you're feeling adventurous and want things to be as realistic as possible, use slate. I won't complain. ;-)
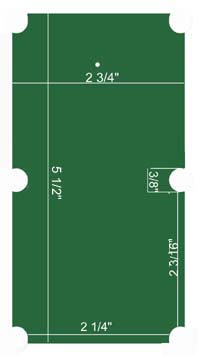
Below is a drawing of measurements for the table. It is NOT to scale, so please go by the measurements listed on it. The measurements between the corner and side pockets are the same for all sides.
Cut each hole out slowly and carefully with an X-Acto knife. When you're done, take a break.
Are you back already? Ok, now it's time to do the bumpers.
Cut 6 pieces of 1/8" x 3/8" wood. Two of these pieces will be 2 1/4" long, the other four will be 2 3/16." Wrap the top narrow half and sides of these pieces with green fabric. (preferably a dark green cotton or polyester blend.) Lining up the edge of the pool table with the center of the bumper, glue each piece in place between the holes. Be sure that there is 1/8" of the bumper above and below the table.
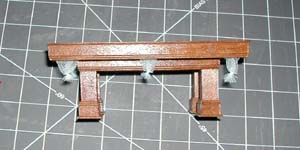
Next, the middle trim. This trim adds depth to the sides of the pool table and defines the curve of the pockets.
Cut 4 pieces 2 3/4" long, and mitre inward. Cut the other two pieces 3 1/4" long, also mitring inward. (This is the longer edge measurement). Stain the top edge and the sides that will show in the pocket. Glue to the back of the bumpers, longer side on the outside. (see pictures for detail.)


The final and outer edge is more baseboard trim. Cut two pieces 6" long, and two pieces 3 1/2" long. Remember, the wide edge goes on the top! Sand, stain and glue in place.
Continue to Finishing Touches